Image Map TPT Facebook Bloglovin' Pinterest

May 28, 2016

Father’s Day Craft Update!


Father’s Day is coming up! Do you have your class make a gift for their dads? I do! I have been making these trophies for many many year! I have exciting news to share with you! I have finally figured out how to make these so much easier! Check it out!


See those WHITE cups? The ones that come 10 in a pack at Walmart for just 97 cents? Buy them instead of the styrofoam cups! The extra few dollars spent will save you so much time wrapping the styrofoam cups in masking tape. I like the way the color of the gold on the white cups better too. It is the same paint on both! This is the easier way friends!
See....


I hot glued the cups together and then painted with a foam brush. This is 2 coats. I might have my kiddos do 3. The prep time has been cut down so much! My hubby was so happy because I always recruit him to help with the masking tape. He was thrilled at my find! You can probably find the cups at any party supply store. Guess what? You could even buy a pack of GOLD cups if you wanted! There wouldn’t be anything for the children to do in order to make this for their Dad. I want them to paint so I kept with the white.

Below is the original post that I wrote back in 2014 on how to assemble this great gift! I still have gold paint in the picture from two years ago! 


Hello friends! Do you have a Father's Day gift in mind for your kiddies to make for their dad? Father's Day this year is June 15th! Why not have the children in your class present their dad with a trophy for being a #1 DAD or WORLD'S GREATEST DAD? 

Below are the steps to make this awesome gift! I got the idea from my nephew's daycare and have been using it ever since (he is now 8). I think I have mastered the steps in this project to be the most efficient. You do however, need time! You cannot expect to get this done in one day! So gather up your supplies and start early!


I prefer the styrofoam cups that are smooth, and do not have ridges from top to bottom. The masking tape lays flatter on this kind of cup.

It is important to use short strips of tape to cover the cups. You would think you could just wrap the cups like you would wrap an ace bandage around a sprain. It does not work! You will get tons of bumps and lumps! The goal is to get the tape to lay smooth. Use short strips! Depending on the age, students may be able to do this part themselves or with guidance.
I have been making these for quite a number of years. Just last year I decided that I needed to find a better way to make the base for the trophy. Foam? Too expensive. A box? Good, but where to get 17? Make them of course! So I taught myself how to fold them via good old origami! Faster and easier for me anyway. I know some reading this may think I am crazy but really it is easy! You may also want to have your children (depending on age) do this part themselves. I tried to show some pics of the steps but I think it is safer to watch this youtube video on how to do it!
I use card stock. I have not tried construction paper yet. It may work. You need to make sure you use a 12x12 square to start. If you do decide on the card stock you will need something hard to smooth down the edges to make them tight (if not, the box will pop open at the seems). I used a plastic knife. 

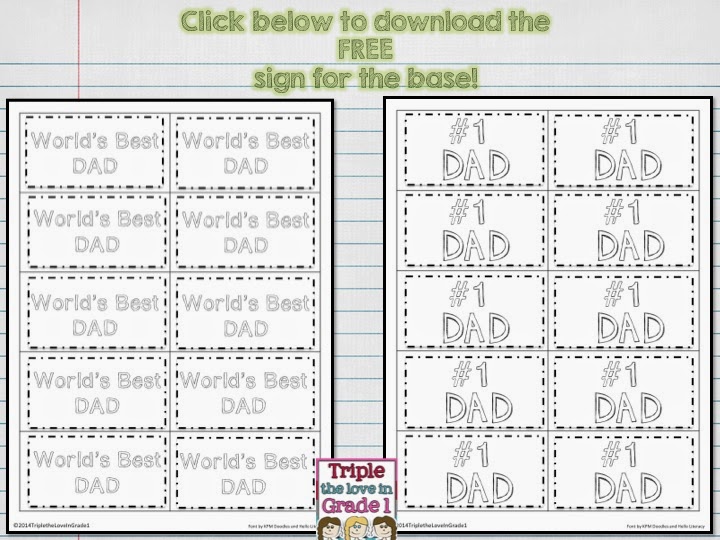
Steps for an alternative way to make a base. I like the boxes better. You may prefer this technique.


Just one more step!


I am going to wrap them in a sheet of tissue paper gathered at the top and tied with a ribbon! I hope you found this useful and maybe inspired you to try something new this year :)

post signature

May 3, 2016

MAY - Pinterest Pick 3


Welcome to my favorite way to start each month - Pinterest Pick 3! 


The minute I saw this on Pinterest, I sent it to my sister in Washington state because I knew she would try it with her class. Of course she fell in love immediately and caught the itch. You know that itch? The one that has you grabbing your keys to get to Michaels ASAP so you can try a Pinterest pin? Yup, that’s the itch!! And my sister caught it...just like me! I am happy to report that she cooked hers in the oven and reported NO terrible smell at all. We were really worried about the fumes. The original post says you could also cook them in a toaster oven! A reader reported that he cooked them down on the barbecue! I am all over that! I will be making these with my crafty daughters very soon!


Need a cute treat for the end of the year party? How about that summer barbecue that is coming soon? Then pin this adorable treat! How cute! I have actually seen those mini ice cream cones at Walmart last year but I think it was closer to summer time. I  will have to keep my eye out for them. The small ones use a regular marshmallow. The regular sized ice cream cones need the jumbo marshmallows. Perfect for the marshmallow lover!


I had to throw in a Mother’s Day craft idea! I feel like I switch things up every year. I wish I had a standard gift to give but I constantly find new and cute things to make on pinterest! Here is an adorable thumb print necklace from Lory at Lory’s Second Grade Skills. She includes the super cute poem on her site as a free download. The clay that she used needs to be baked. I am wondering if I can use the Crayola air dry modeling clay because I don’t want to carry these delicate beauties back and forth to school to bake them. I have made necklaces with the air dry clay before and they came out great so I am going to try it this year. I love the metallic paint that she used. I found out that it comes in....metallic pink...squeal. I’m off to Michael’s to gather up these simple supplies! 

Check out more fabulous Pinterest finds below!

An InLinkz Link-up


post signature